Showing posts with label home decor. Show all posts

Saturday, January 17, 2015

Before and After- The Kitchen

I love a good before and after.


I've posted about our kitchen herehere and here but have never posted the completed after shots. 


It was a process. We were without a functioning kitchen for about 3 months. Greg did most of the work himself on nights and weekends. I tried to pitch in where I could but was limited in my abilities. 

The open shelving is one of my favorite aspects. Greg was able to locate a thick oak slab from a lumber yard that he cut into shelves. I wanted them to be distressed so Greg rounded up random items from the garage (nuts, bolts, nails, chains, etc) and we went to town on them.


We went through a wholesaler and saved on the cabinets so that we could splurge on the counter tops. I had mentioned wanting Carrera marble but knew that the upkeep would not work for us. While Greg was busy with the construction I searched high and low for a workable substitute. It took me quite a few trips to different stone yards but I finally came across White Macauba quartzite and knew I had found the one. It has the properties and maintenance of granite but the look of marble. 


I am so pleased with how it turned out. This room is literally the center of our house so this makeover has made more of an impact on the overall feel of our home than any other. 

Sunday, November 9, 2014

Update- Gallery Wall

The gallery wall is complete.


Here's where we started (you can read more about it in this post).

 
I mostly used prints and pictures that we had on hand but I did order the "Namaste" print off Etsy (can be found here). 


 I was able to incorporate the piece Greg's grandma made and while it's not my usual taste in artwork, it adds interest and a lot of sentimental value.


 Our two Heather Brown prints remind of us of an amazing trip to Hawaii with our best friends. I filled in with smaller frames using a couple favorite photographs. 


I'm really pleased with how it turned out. It was a relatively quick and easy project that has gone a long way to getting this room where I want it to be. In the next few months we would like to purchase new couches. Our current couches are from our apartment days and while they are functional, I think we are due for an upgrade. They are also very dark and too close in color to the floors. The size of this room actually makes it a bit challenging to arrange but as usual I have some ideas brewing. 


Sunday, September 28, 2014

Before and After- The Dining Room

We can finally call our dining room done. (Although is a room every really done?) It has certainly come a long way and now that the chairs are finished I'm calling this room complete. It only took 6 years.

Here's a little before shot for ya going way back to when we first moved in 6 years ago.


I know what you must be thinking. Why on earth did we ever take that moonscape down?! 


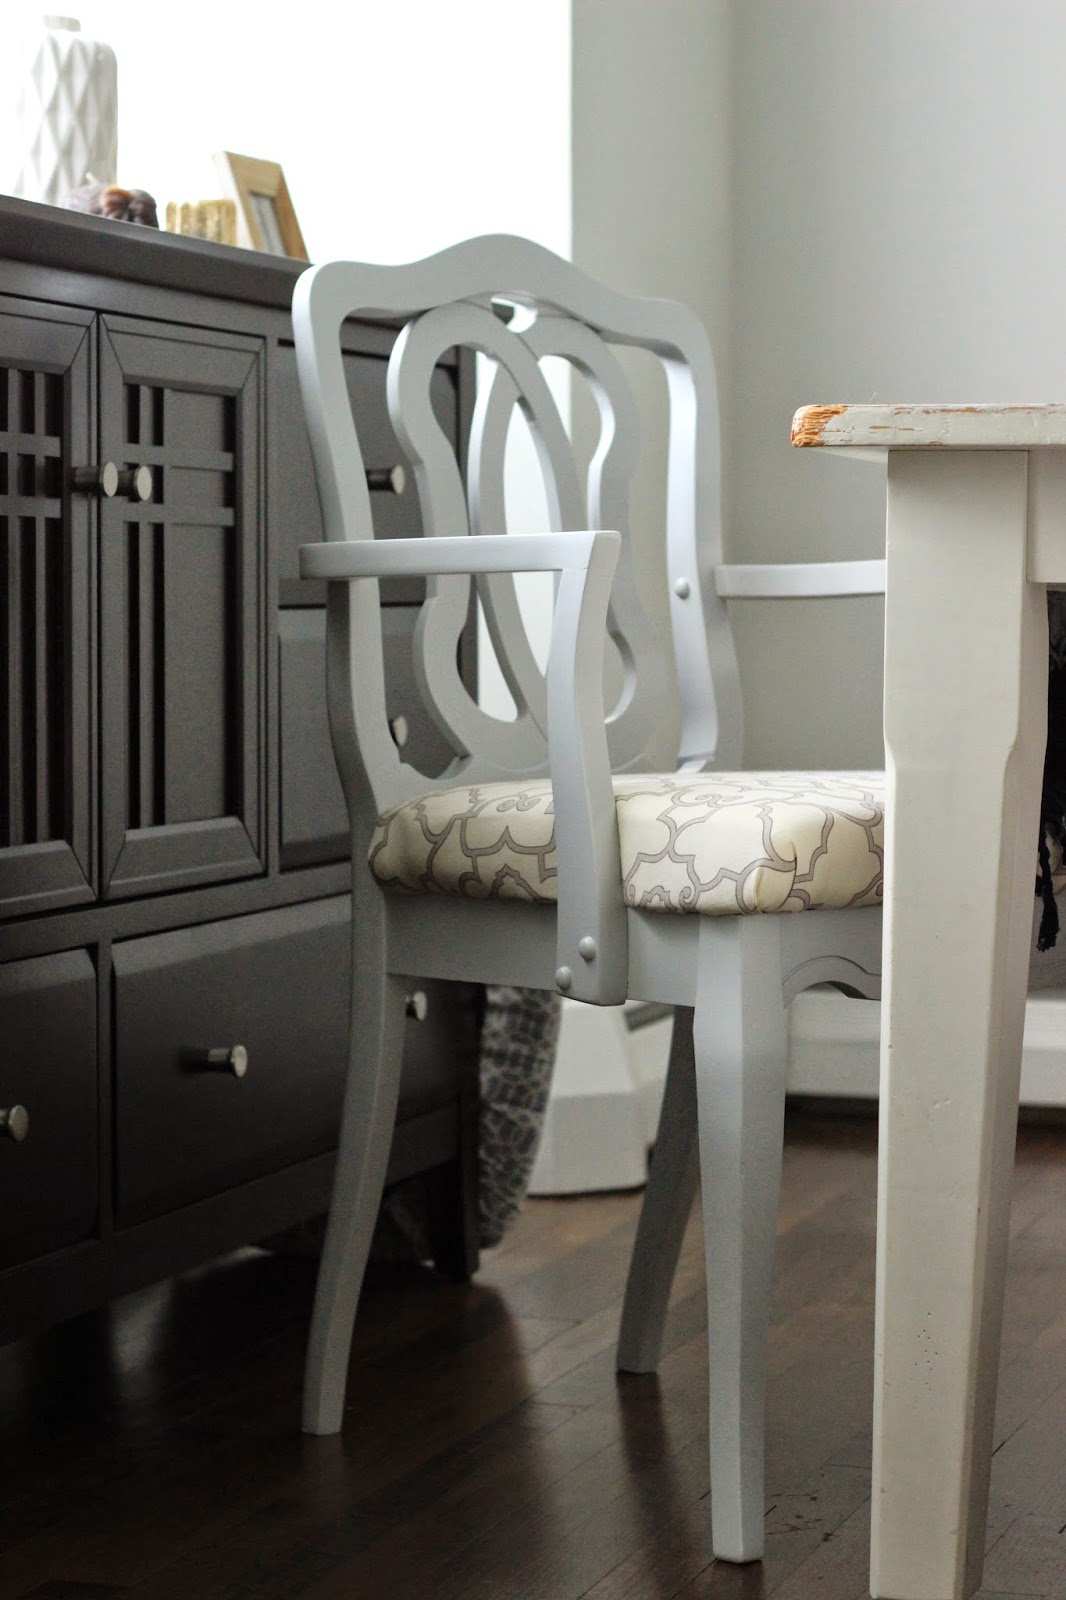
Unfortunately I do not have a before picture of the chairs (it may be forever lost on my broken laptop), so it's hard to appreciate the full transformation they underwent. I'll just tell you they were a beat up dark wood veneer and the cushions had certainly seen better days with little padding left and a few layers of dingy fabrics. Gross. Greg was not too pleased with me when I asked if we could drive to Queens to pick up chairs I had found on Craigslist. (Mostly because this was right after we had painstakingly painted our original chairs blue- you can read about that here). The chairs looked like absolute crap and I thought Greg was going to just walk out on my dream chairs. Instead he talked the guy down and proceeded to finagle all 6 chairs into the Jeep. Now that they are rehabbed even he has to admit they are pretty awesome.
We debated what would be the best option to refinish them- whether we wanted to keep them wood or paint them a color. Because they had a veneer Greg said it would be difficult to sand down and restain so we settled on painting them. I mulled over the color for a while. After the debacle with painting the last set of chairs I wanted to make sure I got it right. I knew I wanted to do something neutral. The blue on the last chairs proved to be too garish so I wanted something more subdued. I decided to go with a grey just slightly darker than the walls. It goes with our current dining room table and will complement the distressed wood farm style table we plan to build in the future. 
I tackled recovering the seats fairly quickly, adding a cushy 2 inch padding underneath. After that the chairs remained stacked in our garage for over a year before we finally made moves to get them painted. Crazy how life gets in the way. We ultimately decided spraying them would be the best option because we didn't have desirable results with hand painting the previous chairs and we wanted them to have a nice smooth finish.  My uncle does automotive body work for a living so we recruited him for the job. He matched my paint color and had them sprayed in one day at his shop. They came out perfect. 


The dining room was the very first room we tackled, mostly because we didn't want to feel like we were walking on the moon every time we came in the door. We painted it dark blue and I loved it. Until about 2 years ago when I decided I hated almost every color in the house. Everyone goes through that, right? 

Some more before, in between and lots of after shots- 


Check out our old faux stone in the kitchen above and the new view below. 


Again you can see a peek of the old kitchen and living room above and the new below. 


We have discussed taking out the wood burning stove and surrounding stone in the future. We actually use it often in the winter, and love that it saves us money on heating, but it takes up a large piece of real estate and could be dangerous for future kiddos. We'll see where we end up with that. For now I am quite content with how this room has come together. It takes time for a home to come together and often you don't get it right the first time, or even the second or third.

Wednesday, August 6, 2014

Painted Patio

Little by little we have been getting the backyard into shape. A couple weekends ago we cleaned up and de-weeded the overgrown patio area. Here it is before and after. 
 
 #cringe


We now have a basic idea of what we want to do with the backyard in the long run but most likely a new patio area is not in the cards until next year at the earliest. We will do the backyard in stages to help spread out the cost. In the Fall we will begin planting various shrubs, flowers and trees along the fence line. As I mentioned in this post I want a more natural, organic feel to the landscaping. First up will be planting in front of the gaping hole to our neighbor's yard. Hopefully this will provide some needed privacy.
In the meantime I have been brainstorming some ideas for the current patio area. Eventually this will all be ripped out but I thought it would be fun to do some cheap updates to make this area a little more inviting. Furniture wise I have to make do with what we have. I don't want to invest any money in new pieces right now because I don't fully know the direction our eventual new patio will take. All of our current outdoor furniture is second hand. The wood picnic table was from the previous owners and the lounge chairs were a Craigslist find when we first moved in. Everything has deteriorated over the years but is usable for now.
I was inspired by this post from one of my favorite bloggers. Adding some paint and pattern could help to spruce up this otherwise drab space. Here are some other images that have inspired me to go in this direction. 


 image from here

 source unknown

image from here

source unknown

 image from here


The summer seems to be flying by so I'll have to see if I can talk Greg into this idea and then find the time to actually do it. There are a few issues I came across in my quick Google search for how-to's on painting concrete but I need to do more research.  If anything I think we may be able to do a sporadic pattern or maybe just around the edges. I have some ideas in mind of what I want to do so let's see if I can actually pull it off.

Saturday, July 19, 2014

The Guest Room

This room actually used to be the master bedroom. This is what it looked like when we moved in. Gotta love the burgundy carpet and pink walls.


When we moved in the house had 3 bedrooms upstairs. What was supposed to pass for a 3rd bedroom was more like a closet. 4 years ago we knocked down the wall between that small room and the second bedroom to make a bigger master. That left the original master open. We had remnants of furniture from past apartments in there along with all the random stuff we didn't know what to do with. Basically a junk room. When we had the occasional guest we would quickly try to make it as neat as possible but really it was just terrible. It was one of those projects that just seemed to keep getting pushed back because we really had no immediate use for the room. A couple of months ago we finally got the motivation to clean it out. We got rid of or donated what we didn't need and found a home for the rest. I always feel so much better, and somehow lighter, when I get rid of 'stuff'. Clutter drives me crazy which is why the door to this room was always closed. Unfortunately (or fortunately), I don't have any photos documenting the space as it was.
We didn't want to put too much money in to it but I wanted to make it more inviting. At least something nice to look at when coming up the stairs. I brought Greg along on a Target shopping trip and we picked up some odds and ends that we thought would work. Here is where we ended up. 


The walls need to be painted and there's still a remnant of that bubblegum pink on the radiator but definitely an improvement. This room gets direct sun in the morning and I love walking up the stairs to see the light pouring in. It makes me happy.


Side table, lamp, ceramic turtle, curtains, yellow and white pouf- Target
Overhead light- West Elm
Down comforter, blue statue- Home Goods
Dresser- vintage from Craigslist (I have plans to refurbish this down the line)
Pillows- Green pillow covers- Etsy, Grey pillow- Target

Wednesday, June 25, 2014

Hitting a Wall


This wall. I have struggled with what to do with this wall from the beginning. Currently it makes absolutely no sense. The layout and the size of the artwork and pictures are just all wrong.  The picture collage is off in its own world and the two pieces of artwork are too small for the space. What goes on here? I have no idea. Certainly not my finest decorating moment.


 Enter this crazy piece of artwork that Greg’s grandmother gave us. Her name is Despina, she is 100% Greek and speaks very little English. She is awesome. It is her tradition to make these crochet artwork pieces whenever a grandchild gets married. We actually had another one bestowed upon us at my bridal shower which pictures a husband and wife. This one we snagged another time while visiting at their house. We have other plans for the husband/wife piece. I think this scenery design would work great on that wall. It is a generous size and the colors work well with the room. 


It's pretty crazy, right? 
Then I started thinking. Why not create a whole frame wall? You can read about the one I created in our stairwell here. These frame walls have become super trendy and probably overdone but I think it’s a great solution for such a huge, oddly shaped wall. We already have some other pieces in mind that we want to incorporate. Some have been sitting around this house for quite some time waiting for a home to be hung.  I may purchase a couple others to fill in the space.  This print from Etsy (mentioned in this post) would make a great addition. I love the juxtaposition of this simple black and white print with the more traditional piece from Greg’s grandma. Plus it ties back to the black and white elements in the room.
I am envisioning an eclectic frame wall. A very different feel from the all-white frame wall upstairs. Here are some of my inspirations. 

image from here

image from here

image from here


image from here

I am hoping this will be the solution I have been looking for and bring this room closer to what I envision it being. In reality it could end up looking like a hot mess. I’ll be sure to share all the details once it starts to take shape.